Pages

Thursday, August 27, 2015

Amazon Echo - Alexa - Orange Ring - Disconnect WiFi

Amazon Echo is a great tool for our family!  Such a simple idea and well designed.  Hope for more voice functionality keeps getting added.

But life is not perfect.  I see many people complaining about "Alexa" disconnecting constantly. This was true even in my house WiFi configuration.  Every day after work I was having to re-connect the gadget to the network which was annoying

You will know this is your problem if you have an Orange ring:

Orange light spinning clockwiseAmazon Echo is connecting to your Wi-Fi network.

The solution:
Just assign a Static IP to Alexa - Amazon Echo in my router. The steps will vary based on your router but the idea is the same.  Find Alexa network MAC address and give it a permanent / static IP address in your router and don't use DHCP for giving it an automatic IP.


Monday, May 18, 2015

Sony Xperia Z3 - Annoying issues fixed by wiping phone cache...

So I have a Sony Z3 Compact (USA), and I do love the phone!  But really it has bitten me a couple of times...  On the good side this annoyances have been resolved by wiping the phone cache.  In this post I will like to list the situations that have been fixed by doing these.  Hopefully others find this post and get saved from factory reset as Xperia Support was guiding me to.


Problems fixed by wiping phone cache:

  • Audio:  
    • speaker volume too low and couldn't switch to loud speaker
  • SD Card:
    • can't move files into it as it was stuck in read-only mode

      ** Update on this:  The SD Card was going bad and acting only as read only until it failed completely.


Tuesday, March 26, 2013

SONY VAIO - SVE14A390X Premium Plus - Review and Enhancements

First of all this is not an "expert review" and it will be totally bias.  Not that I am a fan boy of one brand or another, but I really dedicate myself to find what I want.

REVIEW

For this round I needed to find a laptop that fits all my needs like:

  • Power for development (lots of RAM, decent CPU, lots of memory)
  • Small and light so it can be with me almost everywhere (work, home, on the go...)
  • Touch screen and Windows 8 (to have latest technology changes)


In my wish list of laptops before I found the VAIO SVE14A390X the contenders were:  MacBook Pro - Retina Display and Asus Zenbook - UX51VZ.  But after considering issues I felt with those machines, not having touch screen for Windows 8, and the excessive price (at the moment $2500+), I finally hit the spot with the VAIO SVE14A.  The VAIO SVE14A390X Premium Plus is a customized version direct from Sony Store.  For flat $2000 I got a machine with very similar specs to the ones I was looking for and more...


These are some of the highlights:
  • 3rd gen Intel® Core™ i7-3632QM quad-core processor (2.20GHz / 3.20GHz with Turbo Boost)
  • 16GB RAM DDR3 @1600MHz
  • AMD Radeo HD 7670M (2GB) hybrid graphics
  • 1TB Hard disk @ 5400 RPM
  • Touch screen
  • Windows 8 Pro
  • 2 year SONY Protection plan (covers fall, spills, etc..)
  • Customization / additions included in the $2000 budget

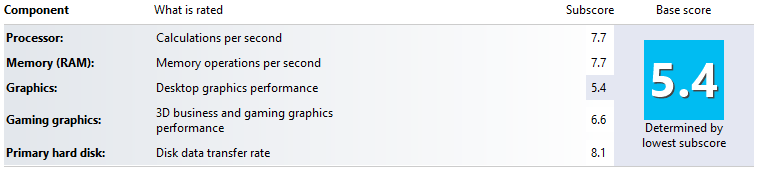
My benchmark for performance was the Asus Zenbook - UX51VZ.  After switching the hard disk for SSD, I got to say the results are very close.  Also not having a RAID 0 SSD configuration is mind easing.  SSD are dangerous still for reliability so adding RAID 0 to the mix is not really something I am looking for.  Plus many reports questions RAID 0 over SSD, but this is just derailing the focus.  Graphics performance are satisfactory but I don't play games so I am good.  The noise of the fan is ok when hot but otherwise is silent.  Surprisingly the temperature of the machine never gets hot bottom or top wise, and this was after installing software for hours.   


So comparing Windows Experience Index we can see the following results:

UX51VZ


SVE14A390X Premium Plus
Look at the hard disk transfer rate increasing from 5.9 to 8.1.  Also the memory operation per second went down, but I am guessing this part of not being good benchmark test process.  Just simple execute and done tests.

OEM Hardware


With Custom SSD


ENHANCEMENTS

Swap HDD for SSD

The only major customization is swapping the HDD (hard disk) for the SSD (solid state drive).  Before I did it myself, I google around for DIY / tutorials about what is needed.  Unfortunately the information I found can be quite confusing for such an easy process.  For this scenario we are keeping the original configuration from the recovery disk and do a new install in the SSD.  Please don't just install an image in the SSD as this can result in bad performance and premature damage to your SSD.

1. Create the Recovery Media

Sony doesn't distribute the Recovery Disks anymore.  Instead they exists in a partition of your OEM disk.  All you have to do is follow the instructions in this link to burn the recovery disks.


2. Swap the HDD for SSD

Below are some images of the swap, but this should be plug and play.  Just take your time and don't force anything.  The only important note is to swap the bracket holding the HDD in place and place it in the SSD as shown in the photos below.


3. Re-install the system with Recovery Media

Once you finish placing the SSD now you need to install Windows 8 OS.  Follow this link for the instructions.  I got to say I am surprise with how easy is with Windows 8 to re-install the OS.  No questions about disk partition, file system format, etc...  Even no need to specify the activation as with Windows 8 this is kind of built in into the hardware (I think motherboard).


Replace DVD  for HDD

Now for the other modification of converting the DVD player into a secondary HDD.  For that we need the caddy to hold the HDD.  The process is simple but take your time!  There are plenty of tiny screws and the face plate is fragile.  Read the following instructions prior to starting the swap.

The only "hard" steps is shown below in the photos.  The trick for taking the face plate out press the tab down while pulling the plate in a rotational motion.  I don't remember the exact direction of the rotation, but just don't pull straight.  This is plastic so if you break it, you are going to be sorry.

The results.  Well the machine is a little heavier but not enough to make a real difference because this is not an ultrabook light.  Actually, having the hard drive makes the machine more sturdy when I grab it on that side versus feeling hollow.  Meaning I can hold it with a solid grip without worrying.  Having a 1TB disk is awesome for system image backups, store movies, ISOs, etc.  Since this is the OEM disk, it contains partitions for recovery and even Windows 8 still installed for the case my SSD fails and I need to react quick.  Noise and heat is the same or none.

Only weird finding is that I can access my old user account in Windows 8 partition.  I don't know what credential Windows 8 in the SSD found to give me access to the old user account, but that sounds like security breach to me.


Press the tab:


While pulling in a rotational manner because the tabs have hooks:


Sunday, February 17, 2013

iPhone 5 - ProClipUsa - AV cable adaptation

My wife listens to music from her iPhone 4 by docking it in the ProClipUsa cradle.  The cradle connects the iPhone to the AV cable and connects to the SUV sound system.  With the iPhone 5 the cable connections have change so I had to figure out a new configuration.

In order to avoid changing the existing iPhone RCA AV cable, I bought the iPhone 5 Lightning to 30-pin Adapter which converts output of digital to analog.  The problem I ran was that the cradles for the iPhone 5 were limited to the original power cable and non of the cradle at that moment will fit the AV cable required for iPhone 5.  The iPhone 5 cables had different width at the phone plug side, which made the fitting non-generic.

FYI - as I wrote this post, I found ProClipUsa  now has an option to buy a cradle which will fit the AV cable.  So no need to do this modification anymore.  But if you have the original ProClipUsa cradle for the power cable, then keep going to see how easy is to modify.

ProClipUsa - iPhone 5 cradles


Quick How To:

First get the tools for stripping the phone plug in the Lightning to 30-pin Adapter.  For this I used a vice-grip and a picker tool with a sharp edge.


With the vice-grips hold the phone plug close to the bottom so you have room on the upper side to break the protecting plastic coating.  Insert the picker in between the plastic coat and the other inner coating.  The idea is to insert in between and break the plastic by pressuring outward such that the cable doesn't get harmed.


This is how it looks once the plastic is stripped.


Now the cable is too thin for staying lock in the cradles opening.  Let's fix that!


Roll a little of electrical tape over where the plastic shield existed.  This will protect the cable plus give the thickness we need to keep the cable in place.


Insert the cable in the cradle and make sure it sits firm.  Then test the cradle a couple of times to make sure the phone plugs and disconnects smoothly.


Sunday, December 23, 2012

Recipe - Coquito Boricua

The Coquito is one of the traditional Christmas drinks of Puerto Rico.  Usually this drink is compare with the American Eggnog.  There are many recipes in the web about how to do the Coquito, and even some debate about the drink having egg yolk or not.  Mine is yet another variation of this common recipe using Fat Free ingredients and "huevo-less" (Spanglish for no egg).


Recipe:

  • 1/2 Regular can of Coco Lopez coconut cream
  • 1/2 Large can of Borden Fat Free condense milk
  • 3/4 Large can of Borden Fat Free evaporated milk
  • 1 Regular can of Thai coconut milk
  • 1 small spoon of Pure Vanilla Extract
  • 1 small spoon of Coconut Extract
  • 1/4 cup of Bacardi Select spice rum
  • 1/2 cup of Bacardi white rum
  • Dash of Cinnamon
  • Pinch of sal
This recipe is not an exact science and very easy to adjust to either sweeter or stronger.


Very Important: - Have fun with it!!!


Friday, December 21, 2012

Design Documents - My Cheat Sheet...

Design documents are something many of us as engineers write to express how business needs will be solved.  These documents are very important for the business because they are what drives the direction of the current development and explains how the goal will be achieved.  A design document is a very important worksheet which captures the requirements, the domain knowledge, the vision, and the implementation idea of what a team will be working to make a reality.

Unfortunately, I have seen through my career that the continuous process of the SDLC dims the importance of design documents for various reasons.  Sometimes is just time frame, others the people are not interested with the project, and in many of them the person writing the design just doesn't know how to express.  I think the latter is the most common one and my focus in this article.

A design is not expected to be perfect, but it should have the following:
  • Express what the problem is and the business requirements
  • Understand who are affected by the problem
  • How will the problem be solved in a non-technical way
  • Only include important technical details and don't code the design
  • Try to interest your audience by expressing their focus, not yours

I decided writing about design documents after helping a teammate with reviewing his paper.  Below is a "copy / paste" of what I wrote to him.  Hopefully this helps others because writing documents is something that really has aid my career when presenting projects.  Remember, don't get stuck in making it perfect but instead spend the time in making it concise and attractive.

Letter to my teammate:

"In general, you should learn to organized your thoughts when expressing an idea.  It doesn’t have to be perfect, but at least help the audience understand why is this important for them.  This is something I think we all learn as we progress in the career.  The sooner you master this, the quicker you will build professional documents.


Here are some tips:
  • Start your paragraphs with functional description.  Forget the computer for a moment and explain what is needed and how you plan to achieve it.  Technical implementations come and go, but the concept of what we are trying to achieve is the core of the project. 
  • Personally, I try defining an Outline of ideas..  What is needed?  Which bits and pieces are required to achieve it?  Any questions or gaps?  Dependencies to think of?  Possible blockers?  So far I have not talk in computer terms but project focus. 
  • Once I have that outline, I try writing paragraphs explaining the bullet points and connecting the parts.  I go through several iterations myself...
  • The good thing of writing all these functional paragraphs is that later you can go one by one and as you read them, you will get all the ideas and requirements for the technical sections of the document. 
  • Another thing I learned with time is not to get hanged in writing technical information.  Why?...
    • When you are the developer.  You know how to do it and you are better off writing it directly in code. 
    • When you it hand off to an experience developer.  In this case the experience developer knows the tools and knows the system.  Usually they want just the different technical points.  They benefit more from understanding the idea and not how to achieve it.  Actually too much details becomes two cooks in the kitchen… 
    • When the developer doesn’t know the technology.  At that point giving them the code and technical details will not solve anything for them.  They will need guidance and is better to don’t even give them code so they can’t copy / paste it blindly.  And yes, I have seen that happen.  I think the best approach here becomes train and code.  Where you as the designer need to do some code work with the developer so they can learn from you.

Hope you find this helpful.
"


Thursday, August 23, 2012

Geronimo 3 - OracleConnection unwrap AbstractMethodError - JDBC4

I will update and post more information about this later...

But meanwhile I will  post links to the forums I wrote to resolve the problem.
TranQL - https://jira.codehaus.org/browse/TQL-31?focusedCommentId=306715#comment-306715
Spring - http://forum.springsource.org/showthread.php?129311-Cast-ConnectionHandle-to-OracleConnection
Geronimo - https://issues.apache.org/jira/browse/GERONIMO-6383

If you are going through the same and need some help, just post a comment.

Related Errors:

java.lang.AbstractMethodError: org.tranql.connector.jdbc.ConnectionHandle.unwrap(Ljava/lang/Class;)Ljava/lang/Object;

java.lang.ClassCastException: org.tranql.connector.jdbc.ConnectionHandle cannot be cast to oracle.jdbc.OracleConnection

Tuesday, July 31, 2012

Spring - Making a self configurable project

In my projects I prefer having self configurable solutions and avoid any additional involvement for deploying an enterprise application (EAR file).  For example, if the project needs to call some web services but the host address depends of the environment where the deploying is occurring (i.e. DEV, QAT, UAT, PROD).  Or you might need specific settings in each environment like DEV where you want to have more traces and debug information.  Imagine having to configure each setting every time you deploy...  plus this is prone to errors.


So how to make the solution self configurable?

In my case I use a combination of the JAVA env variable and Spring.

Set ENV Variable

Configure the JVM which hosts your application and set the vm argument:  -Denv <name>.

For example if using Geronimo application server, I will set this in the Launch Configuration where the VM arguments are configured.

-javaagent:"$(GERONIMO_HOME)/lib/agent/transformer.jar" -Djava.ext.dirs="$(GERONIMO_HOME)/lib/ext;$(JRE_HOME)/lib/ext" -Djava.endorsed.dirs="$(GERONIMO_HOME)/lib/endorsed;$(JRE_HOME)/lib/endorsed" -Xms512m -Xmx1024m -XX:MaxPermSize=512m -Dorg.apache.geronimo.home.dir="$(GERONIMO_HOME)" -Dkaraf.home="$(GERONIMO_HOME)" -Dkaraf.base="$(GERONIMO_HOME)" -Djava.util.logging.config.file="$(GERONIMO_HOME)/etc/java.util.logging.properties" -Dkaraf.startLocalConsole=false -Dkaraf.startRemoteShell=false -Denv=dev

Spring - ENV Configuration

I use Spring Framework to handle many of the dynamic characteristics of the project.  With Spring I can read the JVM env variable and do the following inside the applicationContext.xml file to achieve a self-configurable solution.

Spring - ApplicationContext.xml

This file is used by Spring to configure the application being loaded.  In the configuration I list two files:  application.properties and application.${env}.properties.  Notice the property files are bundle in the compiled JAR, so they are not easily visible nor accessible.  Plus you don't have to worry about the physical path since the files will be in the classpath.  The reason for having two files is that I can use one for all the general properties and another for environment specific settings.  Be careful that the order of the property files is important in the applicationContext.xml for how values are overridden.


    classpath:com/jonnazario/myapp/properties/application.properties
    classpath:com/jonnazario/myapp/properties/application.${env}.properties


For my preference I have a SystemProperties class which I load with values that are important for the application (i.e. Version, DevModeEnabled, HostName). For this I pass the property values as arguments to the constructor and if they are not defined in the property files, I still set the default values within the applicationContext.xml file.

Properties file

These are example values for the general and environment specific application properties files.  See how some properties are overridden while other are not defined at all.

Configuration - General
# -- General Properties
app.Version=2012.07.01.00
app.devModeEnabled=false

Configuration - DEV
# -- DEV Properties
app.Version=work.in.progress
app.devModeEnabled=true

Configuration - PROD
# -- PROD Properties
app.hostname=www.myapp.com


Hope this helps.

Wednesday, July 11, 2012

Android WebTop - CarPc Setup

For a while I have been working on integrating my phone into the car.  I thought about doing a full CarPC project like the ones in mp3car.com, but the reality is that I am cheap plus I want something "maintenance" free.  Well really.. what project is maintenance free?....  :)

The easy route to accomplish my goal was to use my aftermarket head unit display (Avic Z110BT) mixed with Motorola Atrix Webtop.  When I connect my "rooted phone" to the HDMI, the Webtop application takes over and I can see the Android screen in the head unit and the phone becomes a mouse and keyboard.  This allows me to take advantage of the Android applications like:  Google Maps, Pandora, Trapster, etc..  For aid, I use Vilingo to read text messages and voice commands.  Another future I like a lot is remote desktop to my in car notebook for running car diagnostics.

Too much talk...  Let me just show it and ask.  :)

Connection:


In this clip I show how the connection occurs between the Android WebTop and the the car's console.  For this project you need a head unit with video / audio input, hdmi to rca converter, power supply for phone and converter, phone mount.

Apps:


In this clip I show a basic idea of the apps. Something I missed recording is the usage of Vilingo for aiding in the hands free solution.  Also Vilingo developers.. please make the activation voice command to be always listening for "Hey! Vilingo" instead of only when app is open....


Car Monitoring:

In this clip I show how I monitor my car from within my phone.  I have a separate notebook computer which boots when car is on and hibernates when car shuts down.  From the phone I use WiFi AdHoc tethering so the PC and the phone can communicate wireless and I can remote desktop in.  The program shown is RossTech Vag-Com which is an OBDII monitoring tool for Audi.

My Car:  (Love Audi!)


Major progress:
  • Fix resolution of the rendered screen by updating Webtop X11 config
  • Hardwire the notebook computer used for monitoring the car
  • Setup tethering between notebook and phone (automatic)
  • Setup remote desktop and aspect ratio to be manageable from phone
  • Configure the remote Windows machine to have bigger icons, fonts, etc...


TODO:
  • Automatize the expansion of Android screen in head unit upon Webtop connection
  • Use something like Tasker which starts / stops Android apps upon detecting head unit bluetooth (just for knowing I am in car and is ON)
  • Better hands-free automation

Sunday, July 1, 2012

BIRT 3.7 - Dynamic connection profiles

The other day I used BIRT 3.7 Report Engine Runtime for generating reports over the web.  The reports creation and access will occur from different clients using technologies like .Net, JAVA, etc...  And the report design will use web services as the data source for populating the report information (data, images, etc..).

Something I had a little trouble when making the dynamic report was how to specify the data source connections dynamically?  In my case the solution is self-configure through having an environment variable which identifies the system as DEV, QAT, UAT, PROD.  All the different projects could be built one time and deploy to different environment without any configuration change.  I wanted the same for the reporting solution.

The ideas I read for making dynamic connections required to:
  1. Define the connection profiles pointing to the data sources
  2. Pass the connection profile name in the URL
This solves most of my problems, except when I found out that refreshing the web service WSDL schema will failed due to not knowing the connection profile to use.  For this I made a simple scripts which always defaults to the development connection and overrides when the connection profile parameter is passed in.
var profName = "DEV-Localhost.conn";

try { 
    profName = params["connProfileName"]; 
} 
catch (err) 
{  /* continue... */ }

reportContext.getAppContext().get("birt.viewer.resource.path") 
    + "/report/config/" + profName;


Putting it all together...

  1. Create the dynamic web project to host the BIRT report engine runtime.  In my setup I have "birt.viewer.resource.path" pointing to the WebContent folder.  So I just need to point the report designers in <path>/report/design/ and the connection profiles in  <path>/report/config/
  2. Define a connection profile for the data source.
  3. Define a report parameter for the connection profile name.
  4. Duplicate the profile connection file and edit the URI address to the data source.
  5. Dev-Localhost.conn


  6. Go back to the data source and add  in the property binding section the connection profile store script from above.
  7. Test the report by passing as an argument the different connection profiles in the report generation URL.
http://localhost:8080/WR/frameset?connProfileName=DEV-Localhost.conn&__report=report/design/MyReport.rptdesign
http://localhost:8080/WR/frameset?connProfileName=QAT-Server.conn&__report=report/design/MyReport.rptdesign
http://localhost:8080/WR/frameset?connProfileName=ETC-Server.conn&__report=report/design/MyReport.rptdesign

Thursday, June 28, 2012

JAVA - Generics and design

What is generics?

Is a programming functionality which allows a type or method to operate on objects of various types while providing compile-time type safety. [1]  Generics add stability to your code by making more of your bugs detectable at compile time. [2]

The basic syntax in JAVA is <T extends MyClass>, where T is the generic variable to be used in the function implementation which in this case it will handle MyClass and all subclasses.  Imagine you need a function to sort objects of MyClass type and all their subclasses.  Without generics you will need a function per type.  But thanks to generics you can have only one function to handle all subclasses.


Example:  
Non-Generic Generic
public void MyFunction(MyClass aClass);
public void MyFunction2(AnotherClass aClass);
....
public <T extends MyClass> void MyFunction(T aClass);
Duplicate code to handle each subclass Only one function can handle all classes derived from MyClass


For detail implementaion information:

http://docs.oracle.com/javase/tutorial/java/generics/index.html


Generics are useful for...

The power of generics can be appreciated when designing components that other developers will use.  I find this specially important when you need to constrain the domain, but leaving it generic enough.  So why constrain the domain if we are talking about generics usage?  Because in my experience, developers take nasty shortcuts (supposedly to save time...) and use arguments type of strings or objects, or any wtfClass to hack there needs. Having a well define generic function will help other developers understand better the input of a method and avoid errors.


Example:  Generics and Design

In this example application we have an Activity which processes a ResultRes container.  The only purpose of an Activity is to modify the values of the ResultRes object.  You will see how using generics avoids unexpected errors and help developers understand better the classes needed to interact with an activity.

Download:  Source Code
Read the comments in the code for insight about the demonstration...

Parts of the application:

  • ResultRes - is the generic results container.
  • IntegerRes & StringRes - are sub-classes of ResultRes with different value types. 
  • ExecTemplate - is the generic class for activity execution.
    Notice how the template definition is the main issue in the design.
  • ActivityInt & ActivityString - are implementations of the ExecTemplate.
  • ExecGenerics - is just the Main() for testing the project. 

Main Program - usage of generics...

package generics.main;
public class ExecGenerics {

 /**
  * Example application about design and usage of generics.
  * The functionality is just to present how a background processing 
  * can cause exceptions due to bad design implementation which could
  * been avoided.
  */
 public static void main(String[] args) {
  
  boolean isUsingOriginal = true;
  
  // Set starter values...
  // This value will be modified by execute()
  IntegerRes i = new IntegerRes();
  i.setFieldValue(123);   
  StringRes s = new StringRes();
  s.setFieldValue("123");

  // print original values
  System.out.println(i.getFieldValue());
  System.out.println(s.getFieldValue());
 
  if (isUsingOriginal) {
   new generics.original.ActivityInt().execute(i);
   new generics.original.ActivityInt().execute(s); 
   // -- ^^^ this is LEGAL & PROBLEM.. execution will fail!
   new generics.original.ActivityString().execute(s);
  }
  else {
   new generics.improved.ActivityInt().execute(i); 
   // -- ^^^ watch how the helper shows the correct input class 
   // -- ^^^ (Ctrl+Space) inside parenthesis
   // new generics.improved.ActivityInt().execute(s); 
   // -- ^^^  this is NOT LEGAL NOW.. (won't compile)
   new generics.improved.ActivityString().execute(s); 
   // -- ^^^  watch how the helper shows the correct input class 
   // -- ^^^  (Ctrl+Space) inside parenthesis
  }
 
  // print values after processing
  System.out.println(i.getFieldValue());
  System.out.println(s.getFieldValue());  
 }
}


Execution Results

original (isUsingOriginal = true)
123
123
EXEC:  START    - class generics.original.ActivityInt
EXEC:  COMPLETE - class generics.original.ActivityInt
EXEC:  START    - class generics.original.ActivityInt
Exception in thread "main" java.lang.ClassCastException:
 generics.shared.StringRes cannot be cast to generics.shared.IntegerRes
 at generics.original.ActivityInt.performAction(ActivityInt.java:10)
 at generics.original.ExecTemplate.execute(ExecTemplate.java:11)
 at generics.main.ExecGenerics.main(ExecGenerics.java:32)
improved (isUsingOriginal = false)
123
123
EXEC:  START    - class generics.improved.ActivityInt
EXEC:  COMPLETE - class generics.improved.ActivityInt
EXEC:  START    - class generics.improved.ActivityString
EXEC:  COMPLETE - class generics.improved.ActivityString
999
999

Execute Template - Generic template design...

original
package generics.original;
public abstract class ExecTemplate {

 protected abstract void performAction(ResultRes res);
 
 public void execute(ResultRes res) {
   System.out.println("EXEC:  START    - " + this.getClass().toString());
   this.performAction(res);
   System.out.println("EXEC:  COMPLETE - " + this.getClass().toString());  
 }
}
improved
package generics.improved;
public abstract class ExecTemplate<T extends ResultRes> {

 protected abstract void performAction(T res);
 
 public void execute(T res) {
   System.out.println("EXEC:  START    - " + this.getClass().toString());
   this.performAction(res);
   System.out.println("EXEC:  COMPLETE - " + this.getClass().toString());  
 }
}

Activity - No casting needed when well designed...

original
package generics.original;
public class ActivityInt extends ExecTemplate {

 @Override
 protected void performAction(ResultRes res) {
  IntegerRes r = (IntegerRes) res;  // <-- Casting is required and not safe...
  r.setFieldValue(999);
 }
}
improved
package generics.improved;
public class ActivityInt extends ExecTemplate<IntegerRes> {

 @Override
 protected void performAction(IntegerRes res) {
  res.setFieldValue(999);  // <-- No casting required and enforces type
 }
}


Wednesday, June 6, 2012

IE9 - Corporate applications - Warning! - Rollback to IE8

IE9, a more beautiful web...  But does it works?

Preamble, this rant starts with my frustration over a legacy 3rd party solution used in the company which works in IE8 but NOT in IE9.  No compatibility mode or anything like it will fix the JavaScript failures / misbehaviours produced after switching to IE9.  So be careful and test your legacy corporate applications prior to rolling IE9.

In my case I had the source code for the legacy ASP .NET application and gave it a try to solve the issue.  For me the problem was the interaction between ASP .Net UpdatePanel and JavaScript execution.  For a moment I was able to hack something out and get it working..... BUT!!!.... then an IE9 security update came in and whatever that did, it totally mess up the "hack / fix".  Since fixing it wasn't my job, I had to move on and wait for the 3rd party to come up with the IE9 update which of course they want to get paid for.

Meanwhile I have to roll back to IE8 because IE9 was pushed to me over updates.  To my surprise, IE8 is not supported for Windows 7. In order to roll back IE8 in Windows 7, you need to know the trick

From nquinnell:
  1. Go to Control Panel, Uninstall Programs, then choose the option for Turn Windows Features On or Off.
  2. Uncheck the box before Internet Explorer 9. Let it uninstall.
  3. Go back to View Installed Updates on the left.
  4. Scroll down to Microsoft Windows until you see Internet Explorer 9. Uninstall it.
  5. Reboot.
  6. Go back to Control Panel, Uninstall Programs, and choose Turn Windows Features On and Off. This time, instead of showing Internet Explorer 9, it will show Internet Explorer 8. Check the box.
  7. IE8 installs. Reboot, and then put the icons back on your desktop.

Tuesday, May 22, 2012

Software Engineering Tips

These are tips & ideas I have learn through my career which help me daily with the thought process in situations I am in.  I will like to thanks all those out there who influence me in a positive way.

80/20 Productivity to Effort Ratio

What this means is you can accomplish 80% of the work with about 20% of the effort.  But to accomplish the remaining 20% work you need an 80% effort.

For me this relates to a new software project when building it from scratch.  With little work you build the base architecture but you still have a long way to complete the actual project. Using the architecture you can quickly add most of the implementations for the final project and most certain that will get you the 80% work done with 20% effort.  But then you hit the corner cases and you have to re-think how to implement them trying to follow the existing architecture.  These cases fall in the 20% work left and it takes an 80% work to actually integrate correctly.


Take the bull by the horns!

Early in my career the company was growing too quickly and my manager had too much on his plate.  But he wanted me to grow with him and gave me great opportunities by being the main contact between some of the customers and the company.

I remember being shy because I have never handle business, so I was afraid to fail.   One day he gave me  a great advice saying: "Jon, you have to take the bull by the horns! Be the driver and own it!"

This was like a wake-up call for me.  He trusted me and wanted me to take charge to make things happens.  He push me to think "out of the box" and do things my own way or any other way to get things done.

With time I realize how important is "to take the bull by the horns!".  When you really do it, you own the game.  You are on top of the requirements, design, and implementation.  For me owning it makes the job easier because you know all the angle and probably better than anyone else since you are now the expert.

But just remember that "with power, there comes great responsibilities".  So when you make calls don't take them slightly.  People will look to you and drive by your direction.  So is your fault if you sink the ship.


The Team Lead

When you have a team, it stops being about you and the game becomes being a real leader.  For this you need to try knowing your team, what they are capable of, and what they are interested in.  Help them get their tasks complete by offloading obstacles and avoiding any interruptions which disturbs focus in the main goal.  Trust them because most people really want to do their job right.  At the end, as a group is better to have only 1 person behind (yourself) than 4 to 8 people with their tasks half done.

I have big shoes to fill compare to the team leader I had once.  He always was there for the team and earn our respect for that.  The relative small team we had was able to achieve pretty big tasks in the company because he kept us focus and he handled must of the business needs.  He was a great listener who adjusted to feedback from his peers as well as his team.


Listen & Be Respectful

We all have ideas and see things differently. A problem can have more than one solution, so the trick is listen for ideas.  My best friend and I are totally different customers and designing something brings always the best conversations.  His appreciation for how a solution should work is so different from mine but we both are good listeners and discuss both approaches (by trying NOT to endanger ourselves).  Like I tell my daughter:  "Need to use  your listener ears!".

Not everyone has this skill so sometimes you have to put an extra effort to listening at others first.  That will give you time to think about your proposal and how to present your idea better.  At the end, the only real time to push hard is when a decision is about to be made.  
 
So listen, because there best knowledge is built collectively.


I can do it too...

If one can do it, I can do it too!  This is a motto which have taken me long way.  It got me into computers, electrical, mechanics, building, cooking, design, blogging, and who knows what else.

At the end, trust yourself and try.  Some topics are harder than others.  Especially if is a field you have never dealt with.  But guess what, as you keep trying you will build knowledge and experience.  The things you learn from one field, most certain will help you in another.

It can be scary not knowing and failing.  But guess what, is even more satisfying to learn, stand for yourself, and conquer the subject!


-------------------------------------------------------------------------------

To my readers, thanks for letting me talk to you.

Hope this post helps you and please share your tips as well.  :)

Sunday, May 20, 2012

Phone - Photo transfer direct to share folder

Personally I still store photos in my own server and not in cloud computing.
Maybe I should try looking for a cloud back up service later...

But for those out there who have the same practice, you probably notice that phones really don't have too much support for transferring photos directly to a share folder.  Lots of apps do the same like uploading to certain services or making your phone a host to access from the PC browser.  In my case I like simplicity and control.  I just want to select the photos from my phone and send to local server over wi-fi... done!

So far these are the best options I found.

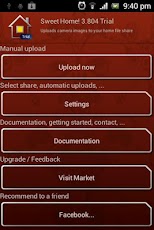
Android:  Sweet Home WiFi Picture Backup


Sweet Home is a simple application which once configured to access your shared folder, it allows you to send the new photos by clicking "Upload Now". And also has an option to automatically upload whenever the phone is connected to the network.  Simple!

This application works really well for me using:  Motorola Atrix 4G & Windows 7 for home server.  It has a free version for try out, but please support the developers and purchase it if you like!  :)

iPhone:  Files Connect


This application is not as simple as Android's Sweet Home for sending photos to the share folder, but it does carry a lot of functionality.  Files Connect is more like a general network file transfer application as the name suggests.

At the end, it is really easy to send photos to the shared folder once this is configured.  You only need to browse for the photos in you phone and "select / copy" them to later "paste" them at the share folder.  Something I liked a lot was the transfer activity monitor which allowed me to see the transfer was not hanged.

In my case I had an iPhone 4G and the share folder in Windows 7 home server.  The application was able to transfer over 1,500 photos with no hangs in a descent amount of time.  It took a little to start the transfer but still less than 1 minute.  I am happy from purchasing the application.

Quick note:
In order to transfer even faster, I browse the phone from the server.  Then PULL the content instead of pushing it.  This significantly reduced the transfer time be 66%.  Just look in your router for the IP the phone is connected to.


General Comment:

If you need applications which directly communicates with your share folder, then search for Samba client applications.  Both of these applications supports the SMB protocol which is what allows the direct access between phone and PC.


Hope this helps others.

Business over Engineering

This post is a retrospection of a simple concept for managers, but something new engineers tend to struggle with.  I include myself in that group when I recall being a fresh graduate and ready to do things the best possible and try saving the world.. (but I never got the cool flying cape).

Early in my career I struggled with the problem of:
Business > Engineering (business over engineering).

I think this is a very common problem for most technical oriented people.  Why?  Because they know the in & out requirements to solve the problem, but not always have the best resources or scenarios to give it an "engineering solution".  They only know business is pressuring and that causes to deliver a "non-optimal" solution.  :(

I remember this struggle kept me asking WHY?..  Why can't I deliver a "perfect" solution?...

For me to understand this, I had to understand the Business problems.

That's when I realize:
Sales > Business (sales over business).
In order to have business, we need sales.  Why?  Because sales is what makes the $$$ money we all need.  But shouldn't it be Business > Sales because we sell "our businesses".  The reality is NO!  If there is a Sale to make $$$ profits, we will make our business to tap there.

This gets us to pretty much the top of the chain:
Customer > Sales (customer over sales)

Ever heard the expression "the customer has the reason"?  Well, they are the ones $$$ paying after all.  So what the Customer wants is what Sales will try to fit and pitch in for getting the contracts made.  And if an engineer needs to jump through hoops to get there, "they better".

So in summary the chain of business can be summarized as:
Customer > Sales > Business > Engineering

Of course this is a super simplified version of how things work, and devil is on the details of how the actual chain executes.  But it's important for managers to communicate well with their team and get them in the real context of how things work.

Personally I think the key is in identifying where the real engineering is required and separate it from the softer business requirements.  That way your team can focus in building a better core and avoid over engineering functionalities which tend to be more flexible.